
Shopping Cart

Finishing is one of the stages that can have the greatest impact on the final result of a leathercraft project. A clean cut and precise stitching are important, but properly finishing the edges, protecting the surface and choosing the right treatment can make the difference between a piece that is simply finished and one with a refined, professional appearance.
There are different leather finishing techniques, and not all of them are applied in the same way. Depending on the type of leather, the project and the effect you want to achieve, you can use sanding, beveling, burnishing, dyeing, sealing, waxing or surface finishing products.
In this article, we look at some of the most widely used techniques for achieving a uniform and durable leather finish, with particular attention to leather edges, one of the areas that often requires the most work in handmade leathercraft projects.
Leather finishing in leathercraft includes all the work carried out on the leather after the individual pieces have been cut and assembled, with the aim of improving their appearance, feel, durability or protection.
Depending on the project, finishing may simply involve smoothing and polishing the edges or may include different treatments applied to the surface. On a wallet, belt, bag or small leather accessory, attention to the final details helps create a more uniform piece with a pleasant feel.
Before applying any product, it is important to know what type of leather you are working with. Not all leathers react in the same way to wax, dye or finishing products, so it is always advisable to test the product first on a scrap piece of the same leather.
Leather finishing also begins before any product is applied. A clean cut, properly prepared edges and a surface free from dust or adhesive residue will make the finishing process much easier.
Leather edges are one of the most visible parts of many leather goods. If you want to burnish leather edges and achieve a consistent result, the surface needs to be properly prepared first.
The first step is usually to even out the edges and remove small imperfections. Depending on the project, you can use an edge beveler to soften the corners and then sand the edges to create a smoother, more even surface.
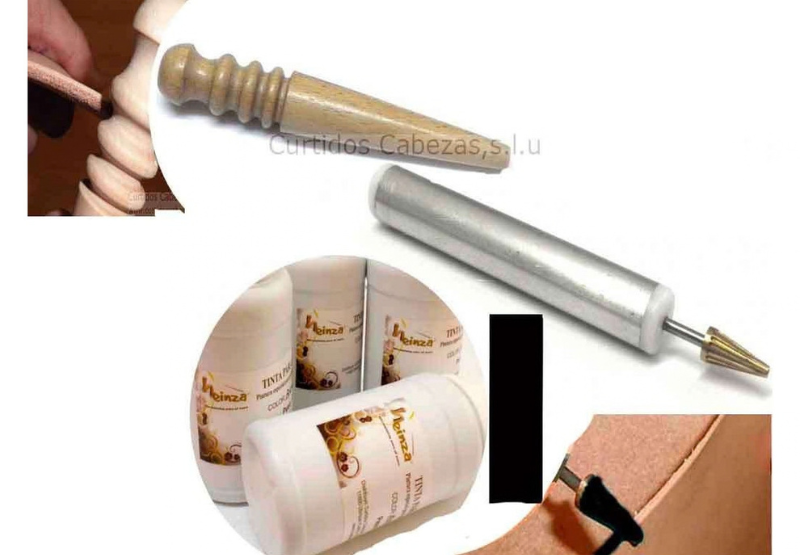
Once the edges have been prepared, they can be polished or burnished. Burnishing involves working the edge through friction to compress and smooth the leather fibres. This technique can be carried out with different tools and products and requires some practice to maintain consistent pressure and speed.
For working on small areas or hard-to-reach sections, the wooden leather burnisher is a particularly useful tool. It features different widths and is designed for smoothing and burnishing leather, allowing you to work precisely on the edges of small pieces.
During the process, avoid applying excessive pressure. The aim is to create a smooth, compact edge rather than deforming it. It is also important to work consistently so that the entire length of the edge has the same appearance.
When a coloured edge is required, burnishing can be combined with specific edge finishing products. Proper preparation remains essential: the more even the edge is before the product is applied, the better the final result will be.
Sealing can be used to prepare certain leather surfaces and edges before applying other finishing products. On leather edges, a sealer can help control absorption and create a more even surface for subsequent treatments.
One option for this type of work is the leather edge sealer, a product designed to act as a filler and prepare the edge before continuing with the finishing process.
Sealing is particularly useful when you want to achieve smooth, even leather edges. However, the product should not be applied indiscriminately. It is better to work with controlled layers and allow each application to settle properly before continuing.
When it comes to protecting the leather surface, the right treatment will depend on the type of finish you want to achieve. Some products provide final protection without significantly changing the original appearance, while others can alter the shine, feel or even the overall appearance of the material.
Before applying a leather finisher or protector to the entire piece, always carry out a small test on an inconspicuous area or on a scrap piece. This will allow you to see how the leather reacts and whether the result matches what you are looking for.
Wax can be used for different purposes in leathercraft. Depending on the product, it can contribute to edge finishing, provide protection or alter the appearance of the surface to create specific effects.
Waxes can also be used to create decorative effects. For example, Wax antiquing wax can be used to give leather an aged appearance and is particularly interesting for projects where you want to highlight the handmade character of the piece.
When conditioning leather, avoid saturating it with product. Applying too much can significantly alter the feel of the leather or leave a greasy surface. It is better to apply a moderate amount, spread it evenly and check the result before applying more.
It is also important to distinguish between nourishing, conditioning, waxing and protecting leather. Although these processes can be related, not all products serve the same purpose and they should not be used interchangeably.
The final finish can significantly change the appearance of a leather project. A matte leather finish maintains a more subtle and natural appearance, while a glossy finish reflects more light and can give the piece a more polished look.
The choice will mainly depend on the type of project and the effect you want to achieve. For projects with a natural aesthetic, you may prefer to maintain a matte or low-sheen appearance, while certain decorative pieces may benefit from a more lustrous surface.
If you want to maintain a matte appearance, you can use a matte final finisher for leather. This type of product is used as a final surface treatment and provides a finish without the characteristic shine of other treatments.
The level of shine can also depend on the leather itself, the type of product used, the amount applied and how the surface was prepared beforehand. For this reason, two pieces treated with a similar product may produce different results if the leather or the preparation process is not the same.
Achieving a good finish requires precision and practice. Many problems that appear at the end of a project are caused by insufficient preparation or incorrect application of finishing products.
The key to achieving good results is to work progressively. There is no need to try to achieve the final finish in a single step. Preparing, checking, correcting and reworking the area gives you much greater control over the result.
For leather edges, for example, you can follow a sequence of preparation, beveling, sanding, sealing, dyeing and burnishing, always adapting the process to the type of leather and the finish you want to achieve.
For coloured edge finishes, we offer different options in our leather edge paints and dyes category. Choosing the right colour allows you to match the edges with the rest of the piece or use them as a decorative element.
Another important aspect is using the right tools. A purpose-designed tool provides greater control and reduces the risk of marking or damaging the leather. This is particularly important when working on small pieces, where tools designed specifically for leather edges can make the process much easier.
A good leather finish is not simply about making the leather shine. It is about paying attention to every detail of the piece: achieving even edges, maintaining a clean surface, applying products in a controlled way and creating an appearance that suits the design.
Burnishing, polishing, sealing, dyeing and waxing are techniques that can be combined to achieve different results. With practice, you will learn how each type of leather responds and which treatment is best suited to each project.
At Curtidos Cabezas, you will find tools for burnishing and working leather edges, products for sealing them and a range of edge paints and dyes for leather finishing. Everything you need to take care of the details and achieve a result that reflects the craftsmanship behind every piece.


Comments (0)